Aplikasi Kubernetes sebagai platform pada ‘connected vehicle’

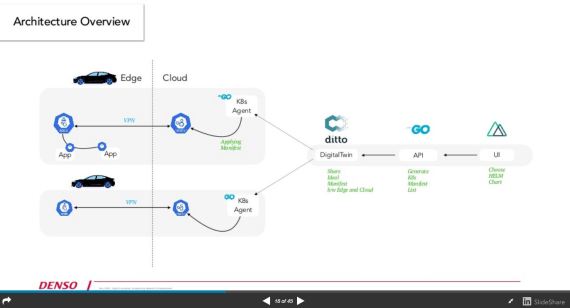
Di KubeFest Tokyo 2020 pekan lalu, Denso (perusahaan Jepang, automotive-parts manufacturer) membawakan presentasi tentang prototype k8s platform bernama “Misaki”, Kubernetes based connected vehicle platform.

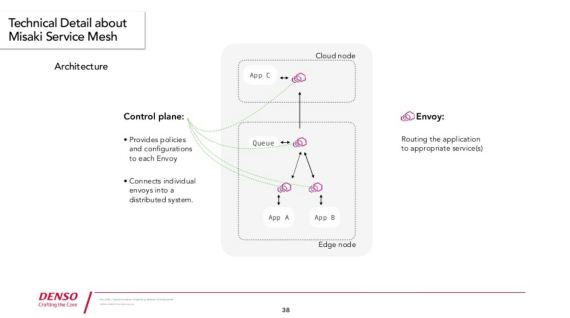
Konsepnya menarik, platform Kubernetes nya didesain dalam bentuk sebuah ‘vehicle cluster’ dengan Master Node/Control Plane berada di Cloud, dan Worker Node(Edge) yang berada di ECU pada sebuah mobil. ECU(Electronic Control Unit) sebagai unit komputasi terintegrasi yang berperan tidak hanya sebagai k8s worker node, tapi juga menjadi pengendali berbagai sensor yang ada di sebuah mobil pintar.

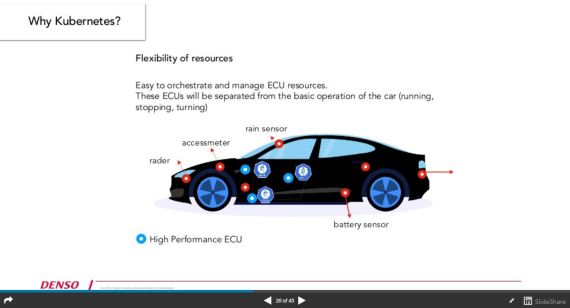
Implementasi use-case nya adalah ‘connected vehicle’, dimana Kubernetes cluster terdiri dari Control Plane dengan Edge node yang bisa dikendalikan secara dinamis. Ketika disetel pada mode connected vehicle, Edge dari banyak mobil pintar terkoneksi dalam satu Kubernetes cluster, yang dalam arti lain sistem ini bisa mengendalikan banyak unit mobil dalam satu cluster nya. Tentunya untuk alasan keamanan, high-spec ECU yang berperan sebagai k8s worker node beroperasi terpisah dengan ECU lain yang mengendalikan operasi dasar sebuah mobil (jalan, berhenti, belok). Sehingga meminimalisir kemungkinan pengendalian mobil oleh pihak luar yang bermaksud tidak baik.

Aplikasi pada sebuah mobil pintar didesain dalam bentuk Pod yang bekerja di atas Edge node. Pod dapat didesain sesuai kebutuhan, misalnya: Anda bisa membuat Pod yang tugasnya untuk mengumpulkan data pada berbagai sensor mobil (camera, rain sensor, accessmeter, battery sensor, etc) dan mengirimkan data tersebut ke storage di Cloud untuk proses selanjutnya. Karena banyaknya sensor dan aplikasi Pod, dibutuhkan peran Kubernetes sebagai orkestrator microservice sekaligus mengatur resource pada ECU secara fleksibel.

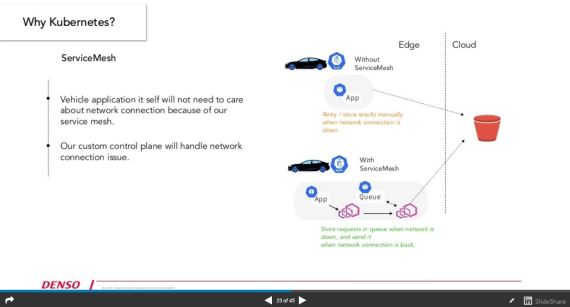
Ada banyak challenges yang dihadapi dalam pengembangan sistem ini. Salah satunya adalah ketika putusnya koneksi jaringan antara Edge unit dengan Control Plane ketika mobil berada di luar jangkauan. Untuk mengatasi hal tersebut, “Misaki” mengimplementasikan ServiceMesh berupa sistem ‘Queue’ yang mempunyai peran sebagai proxy server ketika koneksi jaringan terputus. Queue berfungsi untuk menyimpan HTTP Request dan streaming-data dari aplikasi ketika terjadi gangguan koneksi jaringan, dan apabila koneksi kembali normal, maka Queue akan melakukan retry untuk mengirimkan data yang tersimpan di local storage nya.

Silakan bisa melihat lebih detail tentang arsitektur nya di SlideShare berikut:

Atau lihat di sini untuk presentasi tentang Technical Details nya:


Enjoy DisneyLand even in Rainy Day | Enjoy Tokyo Disney for Muslim (Food, Prayer Space)

★★Disneyland Rainy Day Tips
1. BYORG (Bring Your Own Rain Gear)
-Umbrellas
-Ponchos
-Rain coat
You can buy Disney-brand rain coat at the park.
-Baby stroller covers
-Hats
-Water-resistant shoes or boots
-Small towel
-Waterproof tablecloth
This can provide you with the perfect ground cover to sit on if there are parades and the ground is still wet.
-Prepare extra socks
-Plastic bag
-Smartphone plastic bag

2. Get a locker
You may rent a locker with in-and-out privileges for the day. Put some warm, dry sweatshirts or jackets in the locker for later, and swap them out for damp clothes. If it stops raining, those ponchos can become a little heavy and bulky once you stuff four of them in a backpack, so keep them in a locker for a later time if the rain lets up.

3. Plan your attractions
-Shooting-game attraction Buzz Lightyear’s Astro Blasters in Tomorrowland
-Chat with that mischievous Stitch Stitch Encounter in Tomorrowland
-Take a keepsake photo at Mickey’s House and Meet Mickey in Toontown
-After visiting Mickey, take a look at Minnie’s House in Toontown
-Join in the fun of Pooh’s Hunny Hunt in Fantasyland
-Feel like a camper at Camp Woodchuck Kitchen in Westernland
-Try the games at Jungle Carnival in Adventureland
-Visit Cinderella’s Fairy Tale Hall in Fantasyland
-A magical concert Mickey’s PhilharMagic in Fantasyland
-Mini parade presented only on rainy nights Nightfall Glow at Tokyo Disneyland

★★GUIDE TO HALAL FOOD & PRAYING SPACES IN TOKYO DISNEYLAND & DISNEYSEA
https://blog.halal-navi.com/en/muslim-guide-tokyo-disneyland-disneysea/
https://www.havehalalwilltravel.com/10-tips-to-planning-the-perfect-tokyo-disneyland-trip/
★Tokyo Disneyland
There are no halal-certified foods inside Disneyland, but they do have seafood or vegetarian options for you to try below:
-Captain Hook’s Galley (Fantasy Land): Seafood Pizza
-Pan Galactic Pizza Port (Tomorrowland): Seafood Cream Calzone
-Eastside Cafe (World Bazaar): Vegetarian course

★Tokyo DisneySea
Suitable for both kids and adults, DisneySea is the place where everybody can have a fun time!
-Sebastian’s Calypso Kitchen (Mermaid Lagoon): Seafood options (pizza)
-Ristorante Di Canaletto (Mediterranean Harbor):
.Vegetarian option contained alcohol.
.Look out for seafood options (pizza and pasta).
.Bread, Caesar salad, Tiramisu are safe to consumed!
-Cafe Portofino (Mediterranean Harbor): Seafood pasta
-New York Deli (American Waterfront):
.Smoked salmon and shrimp bagel safe to consume!
.French fries are cooked using vegetable oil on fryer specifically for fries only!
-Cape Cod Confections (American Waterfront): Codfish burger set
-Miguel’s El Dorado Cantina (Lost River Delta): Shrimp tacos and fries.

★Finding a place to pray
a. Tokyo Disneyland
A prayer room is available for Muslims! All you need to do is ask the staff at Main Street House (near the entrance) and request for a praying space! But before that, make sure to look out for a less crowded toilet to take wudhu first (we suggest at Tomorrowland because there are fewer attractions compare to others)!

b. Tokyo DisneySea
Besides taking a wudhu at a toilet, bringing a pray bottle helps make it quick and tidy! After you are all prepared, head to Guest Relations (near the entrance) and they will provide you with prayer room!
#Halal Navi Tips: Make sure to bring a prayer mat, praying attire and Qibla compass.
If you are running out of time, look out for less crowded places and we suggest you to find a spot at Port Discovery

Exam Preparation for Kubernetes CKA and CKAD

List of good source to deep dive about Kubernetes and prepare for CKA and CKAD exam:
1. Kelsey Hightower’s tutorial Kubernetes The Hard Way
Do at least three times! Understand it, internalize it.
2. Read Kubernetes in Action by Marko Luksa
3. Complete all tasks from https://kubernetes.io/docs/tasks/
4. This repo here is great for a testing scenario. It gives you 24 questions to answer, a terminal, and a timer.
5. Practice, practice and practice!! (https://github.com/fahmifahim/kubernetes)

Clusters for practice:

Good reference for saving time before the exam:
These aliases will help save the precious time you have. Use these during your studies, so you are used to them on the day.
alias kc=’kubectl’
alias kgp=’kubectl get pods’
alias kgs=’kubectl get svc’
alias kgc=’kubectl get componentstatuses’
alias kctx=’kubectl config current-context’
alias kcon=’kubectl config use-context’
alias kgc=’kubectl config get-context’

Memos:
https://codeburst.io/prepare-for-the-certified-kubernetes-administrator-cka-with-practice-tests-84562b407c30

Install OpenCV 4 on Mac OS

Install OpenCV 4.0 on Mac OS

Step 1. Install XCode
1.1. First, we need to install the latest XCode.
Grab the info and download the binary from the below Apple website:
https://developer.apple.com/xcode/

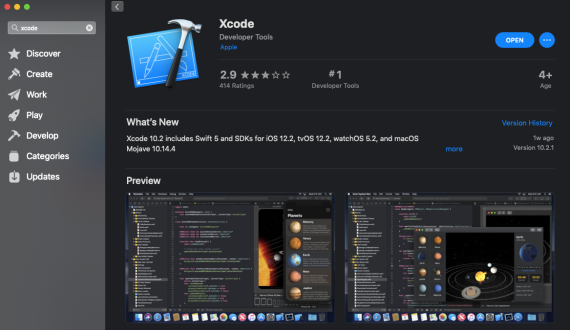
Or, you may download XCode from Apple App Store -> find the XCode app -> install XCode.

1.2. After installation completed, open XCode and accept license agreement.


Step 2. Install Homebrew

2.1. Install the Mac community package manager, Homebrew.

$ ruby -e "$(curl -fsSL https://raw.githubusercontent.com/Homebrew/install/master/install)"

Then, update the Homebrew definitions:

$ brew update

2.2. Add Homebrew to PATH
In order to make our work simple, don’t forget to add Homebrew to our working PATH at .bash_profile file.

$ echo "# Homebrew" >> ~/.bash_profile
$ echo "export PATH=/usr/local/bin:$PATH" >> ~/.bash_profile


Step 3. Install OpenCV prerequisites using Homebrew

3.1. Install Python 3.6

$ brew install python3

Verify whether the Python installation OK or not by typing the below command:

$ which python3
/usr/local/bin/python3

$ python3

Python 3.6.5 (default, Jun 17 2018, 12:13:06) 
[GCC 4.2.1 Compatible Apple LLVM 9.1.0 (clang-902.0.39.2)] on darwin
Type "help", "copyright", "credits" or "license" for more information.
>>>
>>>exit()

3.2. Install CMake and QT (optional)
(This code is only executed if you need CMake and QT for your development)
If you need to work the OpenCV project with CMake and QT, you can execute the below code. If you only need Python, skip this procedure.

$ brew install cmake
$ brew install qt5

Later in this installation, we need to specify the QT path to a variable:

$ QT5PATH=/usr/local/Cellar/qt/5.12.2

*make sure the above path is available on your environment. Check the availability by making sure the path (ls -l /usr/local/Cellar)

Step 4: Install Python dependencies for OpenCV 4
We will install the Python dependencies for OpenCV 4 in this procedure.

$ sudo -H pip3 install -U pip numpy

Now the pip is installed, next, we can install virtualenv and virtualenvwrapper, two tools for managing virtual environments. Python virtual environments are a best practice for Python development and recommended to take full advantage of them.

$ sudo -H python3 -m pip install virtualenv virtualenvwrapper

$ VIRTUALENVWRAPPER_PYTHON=/usr/local/bin/python3

$ echo "VIRTUALENVWRAPPER_PYTHON=/usr/local/bin/python3" >> ~/.bash_profile
$ echo "# Virtual Environment Wrapper" >> ~/.bash_profile
$ echo "source /usr/local/bin/virtualenvwrapper.sh" >> ~/.bash_profile

$ source /usr/local/bin/virtualenvwrapper.sh

The virtualenvwrapper tool provides various of terminal commands:
-mkvirtualenv : Used to “make a virtual environment”
-rmvirtualenv : Destroys a virtual environment
-workon : Activates a virtual environment
-deactivate : Deactivates the current virtual environment
-Refer to this link for more information.

Now, let’s create a Python virtual environment for OpenCV.
In this command, the virtual environment for Python 3 and OpenCV4 will be defined as py3cv4. You may take your own virtual environment name as you wish.

$ mkvirtualenv py3cv4 -p python3

The command result may look like this:

Running virtualenv with interpreter /usr/local/bin/python3
Using base prefix '/usr/local/Cellar/python/3.6.5_1/Frameworks/Python.framework/Versions/3.6'
New python executable in /Users/admin/.virtualenvs/cv/bin/python3.6
Also creating executable in /Users/admin/.virtualenvs/cv/bin/python
Installing setuptools, pip, wheel...
done.
virtualenvwrapper.user_scripts creating /Users/admin/.virtualenvs/cv/bin/predeactivate
virtualenvwrapper.user_scripts creating /Users/admin/.virtualenvs/cv/bin/postdeactivate
virtualenvwrapper.user_scripts creating /Users/admin/.virtualenvs/cv/bin/preactivate
virtualenvwrapper.user_scripts creating /Users/admin/.virtualenvs/cv/bin/postactivate
virtualenvwrapper.user_scripts creating /Users/admin/.virtualenvs/cv/bin/get_env_details

Next, let’s install NumPy, CMake, and other library while we’re inside the environment.

$ pip install cmake numpy scipy matplotlib scikit-image scikit-learn ipython dlib

# quit virtual environment
$ deactivate


Step #5: Compile OpenCV 4 for macOS

5.1. Download OpenCV 4
Navigate to our working folder and download both opencv and opencv_contrib.
In this command, we will create opencv and opencv_contrib folder inside home folder.

$ mkdir -p ~/opencv ~/opencv_contrib
$ git clone https://github.com/opencv/opencv.git
$ cd opencv
$ git checkout master
$ cd ..

$ git clone https://github.com/opencv/opencv_contrib.git
$ cd opencv_contrib
$ git checkout master
$ cd ..

Navigate back to OpenCV repo and create & enter a build directory.

$ cd ~/opencv
$ mkdir build
$ cd build

Now we are ready to execute the CMake.
Make sure to use the workon command before executing the cmake command as shown below.
Notes: I am using py3cv4 as virtual environment. If you are using other name for virtual environment, you should change the below code as your own environment.
This command will take several times. (in my environment it took about 50 minutes ^^;)

$ workon py3cv4
$ cmake -D CMAKE_BUILD_TYPE=RELEASE \
    -D CMAKE_INSTALL_PREFIX=/usr/local \
    -D OPENCV_EXTRA_MODULES_PATH=../../opencv_contrib/modules \
    -D OPENCV_PYTHON3_INSTALL_PATH=~/.virtualenvs/py3cv4/lib/python3.7/site-packages \
    -D PYTHON3_LIBRARY=`python -c 'import subprocess ; import sys ; s = subprocess.check_output("python-config --configdir", shell=True).decode("utf-8").strip() ; (M, m) = sys.version_info[:2] ; print("{}/libpython{}.{}.dylib".format(s, M, m))'` \
    -D PYTHON3_INCLUDE_DIR=`python -c 'import distutils.sysconfig as s; print(s.get_python_inc())'` \
    -D PYTHON3_EXECUTABLE=$VIRTUAL_ENV/bin/python \
    -D BUILD_opencv_python2=OFF \
    -D BUILD_opencv_python3=ON \
    -D INSTALL_PYTHON_EXAMPLES=ON \
    -D WITH_TBB=ON \
    -D WITH_V4L=ON \
    -D INSTALL_C_EXAMPLES=OFF \
    -D OPENCV_ENABLE_NONFREE=ON \
    -D WITH_OPENGL=ON \
    -D OPENCV_EXTRA_MODULES_PATH=../../opencv_contrib/modules \
    -D BUILD_EXAMPLES=ON ..

Notes:
-OPENCV_ENABLE_NONFREE=ON
This is required for OpenCV 4 if you want access to patented algorithms for educational purposes.
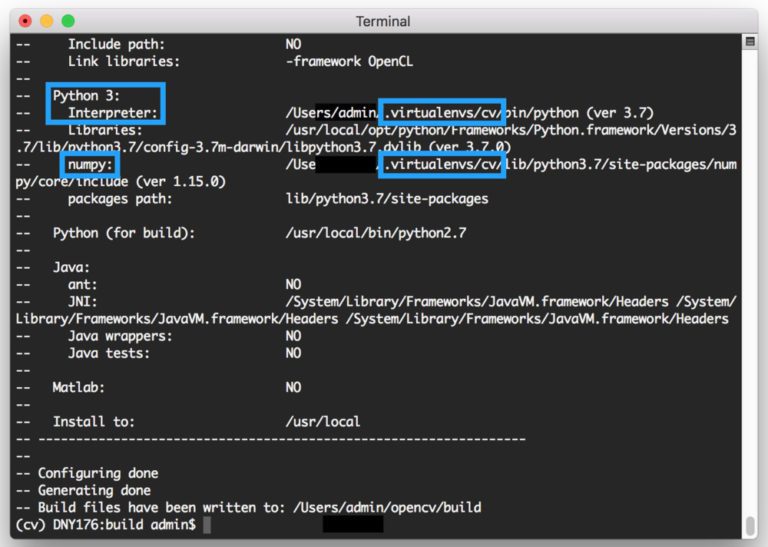
-Once CMake has finished, you will see the following information in the terminal:

*If you need QT in your project, don’t forget to add the below command.
The QT5PATH should be defined in the previous step (3.2. Install CMake and QT)

-D CMAKE_PREFIX_PATH=$QT5PATH \
-D CMAKE_MODULE_PATH="$QT5PATH"/lib/cmake \

Up to this step, if your CMake output is good to go you can kick off the compilation via:

$ make -j$(sysctl -n hw.physicalcpu)
 	
$ sudo make install

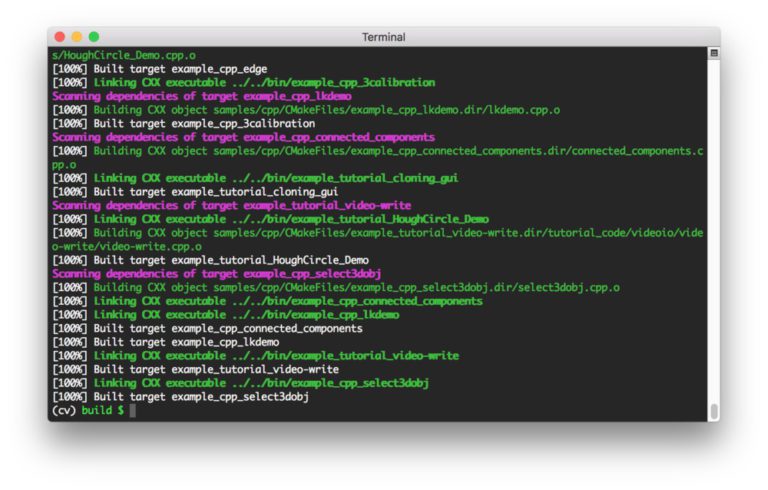
When the process is finished 100%, the screenshot should be like this:

5.2. Install imutils

$ workon py3cv4
$ pip install imutils


Step 6: Test your macOS + OpenCV 4

#Activate your Virtual Environment
$ workon py3cv4

$ python
>>> import cv2
>>> cv2.__version__
'4.0.0'
>>> exit()

Lets Run Our First OpenCV Application!
You may clone one of my OpenCV sample from the below GitHub resource.
https://github.com/fahmifahim/opencv

#Activate your Virtual Environment
$ workon py3cv4

$ git clone https://github.com/fahmifahim/opencv.git

Cloning into 'opencv'...
remote: Enumerating objects: 46, done.
remote: Counting objects: 100% (46/46), done.
remote: Compressing objects: 100% (42/42), done.
remote: Total 46 (delta 2), reused 46 (delta 2), pack-reused 0
Unpacking objects: 100% (46/46), done.

$ ls 
opencv

$ cd opencv/1_experiment/1_face_recognition_adrian/

#Execute the Python program for Realtime Face Recognition: 
$ python recognize_video.py --detector face_detection_model \
	--embedding-model openface_nn4.small2.v1.t7 \
	--recognizer output/recognizer.pickle \
	--le output/le.pickle

#Change directory to Face Detection program
$ cd ../2_face_detection_deeplearning

$ python detect_faces.py --image leaders.jpg --prototxt deploy.prototxt.txt --model res10_300x300_ssd_iter_140000.caffemodel 

#When you finish the program, deactivate Virtual Environment
$ deactivate

Sample result:

Reference:
https://www.learnopencv.com/install-opencv-4-on-macos/

Install OpenCV 4 on macOS

Essential Linux Command and CheatSheet

Linux Command

— ls command
Option
-a
Lists hidden files also. If a file or directory name starts with a dot, it is referred to as hidden.

-F
Displays file types. Shows / for directories, * for executable files, @ for symbolic links and nothing for text files.

-lh
Displays long listing with file sizes in human readable format.

-l
Displays long listing with detailed file information including file type, permissions, link count, owner, group, size, date and time of last modification, and name of the file.

-ld
Displays long listing of the specified directory, but hides its contents.

-R
Lists contents of the specified directory and all its sub-directories (recursive listing).

-lt
Lists all files sorted by date and time with the newest file first.

-ltr
Lists all files sorted by date and time with the oldest file first.

To list files in the current directory with detailed information, use one of the following:
# ll
# ls -l

*** pwd Command ***
The pwd (present working directory) command displays a user’s current location in the directory tree.

*** cd Command ***
The cd (change directory) command is used to navigate the directory tree.

To go back to the home directory, issue either of the following two commands:
$ cd
$ cd ~

To go to the root directory, use the forward slash character:
$ cd /

*** tty Command ***
This command displays the pseudo terminal where you are currently logged in:
$ tty
/dev/pts/1

or you may also type this command to know who you are:
$ who am i
or
$ whoami

*** whoami Command ***
The whoami (who am i) command displays the username of the user that executes this command.

*** logname Command ***
The logname (login name) command shows the name of the real user that logs in initially. If that user uses the su command to switch identity, the logname command, unlike the whoami command, still shows the real username.

*** id Command ***
The id (identification) command displays a user’s UID (user identification), username, GID (group identification), group name, all secondary groups that the user is a member of, and SELinux security context:
$ id
uid=500(admin) gid=500(admin) groups=500(admin) context=unconfined_u:unconfined_r:unconfined_t:s0-s0:c0.c1023

*** groups Command ***
The groups command lists all groups that a user is a member of:
$ groups
admin

*** last Command ***
The last command reports the history of successful user login attempts and system reboots by reading the /var/log/wtmp file. This file keeps a record of all login and logout activities including login time, duration a user stayed logged in, and tty where the user session took place.

To list only system reboot details:
# last reboot

There is another command that lists more detailed information on recent logins and reboots. This command is utmpdump and is executed the following way:
# utmpdump /var/log/wtmp

*** uname Command ***
The uname command produces basic information about the system. Without any options, this command displays the operating system name only. You can use the -a option to get more information.
# uname
Linux
# uname -a
Linux localhost.localdomain 2.6.32-358.el6.i686 #1 SMP Thu Feb 21 21:50:49 UTC 2013 i686 i686 i386 GNU/Linux

*** hostname Command ***
The hostname command displays the system name:
# hostname
localhost.localdomain

*** date Command ***
The date command displays current system date and time.

*** hwclock Command
The hwclock command displays the date and time based on the hardware clock.

*** cal Command
The cal (calendar) command displays the calendar for the current month

*** which Command
The which command shows the absolute path of the command that will execute if run without using the absolute path
# which date
/bin/date

*** whereis Command
The whereis command displays the binary name and the full pathname of the command along with the location of its manual pages:
$ whereis date
date: /bin/date /usr/share/man/man1p/date.1p.gz /usr/share/man/man1/date.1.gz

*** wc Command
The wc (word count) command displays number of lines, words, and characters (or bytes) contained in a text file or input supplied.
# Option
-l
Prints line count.

-w
Prints word count.

-c
Prints byte count.

-m
Prints character count.

*** wall Command
The wall command is used to broadcast a message to all logged in users on the system.

*** ARCHIVING TOOL ***

*** USING tar ***
Command option when using tar command:
-c
Creates a tarball.

-f
Specifies a tarball name.

-j
Compresses a tarball with bzip2 command.

-r
Appends files to the end of an existing tarball. Does not append to compressed tarballs.

-t
Lists contents of a tarball.

-u
Appends files to the end of an existing tarball if the specified files are newer. Does not append to compressed tarballs.

-v
Verbose mode.

-x
Extracts from a tarball.

-z
Compresses a tarball with gzip command.

To create a tarball called /tmp/home.tar of the /home directory:
# tar cvf /tmp/home.tar /home

To create a tarball called /tmp/files.tar containing multiple files located in the /etc directory:
# tar cvf /tmp/files.tar /etc/host.conf /etc/ntp.conf /etc/yum.conf

To append files located in the /etc/xinetd.d directory to home.tar:
# tar rvf /tmp/home.tar /etc/xinetd.d

To list the contents of home.tar:
# tar tvf /tmp/home.tar

To extract files from files.tar:
# tar xvf /tmp/files.tar

To create a tarball called /tmp/home.tar.gz of the /home directory and compress it with gzip:
# tar cvzf /tmp/home.tar.gz /home

To create a tarball called /tmp/home.tar.bz of the /home directory and compress it with bzip2:
# tar cvjf /tmp/home.tar.bz /home

*** Compression Tools ***

*** Using zip and unzip
The following example compresses three files into one called /tmp/files.zip:
# zip /tmp/files.zip /etc/host.conf /etc/ntp.conf /etc/yum.conf

To uncompress the three files, issue the unzip command:
# unzip /tmp/files.zip

*********************************
*********************************
FILE and DIRECTORY OPERATIONS

# The lost+found Directory (/lost+found)
This directory holds files that become orphan after a system crash. An orphan file is a file that has lost its name.

# Creating Files Using the touch Command

#Creating Files Using the cat Command
The cat command allows you to create short text files:
$ cat > newfile

$ ll
total 12
-rw-rw-r–. 1 aghori aghori 48 Jul 28 07:21 file1
-rw-rw-r–. 1 aghori aghori 0 Jul 28 07:30 newfile
drwxrwxr-x. 3 aghori aghori 4096 Jul 28 07:28 scripts.dir1
drwxrwxr-x. 3 aghori aghori 4096 Jul 28 07:30 scripts.dir2
Column 1: The 1st character tells the type of file. The next 9 characters indicate permissions. File permissions are explained at length in Chapter 04 “File Permissions, Text Editors, Text Processors & The Shell”.

Column 2: Displays the number of links that the file or the directory has.

Column 3: Shows the owner name of the file or directory.

Column 4: Displays the group name that the owner of the file or directory belongs to.

Column 5: Shows the file size in bytes. For directories, this number reflects the number of blocks being used by the directory to hold information about its contents.

Columns 6, 7, and 8: Display the month, day of the month, and the time at which the file or directory was created or last accessed/modified.

Column 9: Shows the name of the file or directory.

*** File and Directory Control Attributes
Attribute

Effect on File or Directory

a (append)

File can only be appended.

A

Prevents updating access time.

c (compressed)

File is automatically compressed on the disk.

d (dump)

File cannot be backed up with the dump command.

D
Changes on a directory are written synchronously to the disk.

e (extent format)
File uses extents for mapping the blocks on disk. Set on all files by default.

i (immutable)
File cannot be changed, renamed, or deleted.

j (journaling)
File has its data written to the journal before being written to the file itself. See Chapter 10 “File Systems & Swap” for details on journaling.

S (synchronous)
Changes in a file are written synchronously to the disk.

To list current attributes on install.log:

# lsattr install.log
————-e- install.log

# chattr +i install.log
# lsattr install.log
—-i——–e- install.log

Now, try deleting this file as root:
# rm install.log
rm: remove regular file `install.log’? y
rm: cannot remove ‘install.log’: Operation not permitted

To allow only the append operation on the file:
# chattr +a install.log
# cat /etc/fstab >> install.log

To unset both attributes:
# chattr -ia install.log

*** diff

Compare between two files or two directories

$ diff -c file1 file2
$ diff -c folder1 folder2

Copy folder to a folder
$ cp -r folder2 folder1

*** find Command
The find command recursively searches the directory tree, finds files that match the specified criteria, and optionally performs an action. This powerful tool can be customized to look for files in a number of ways. The search criteria may include searching for files by name, size, ownership, group membership, last access or modification time, permissions, file type, and inode number.

To find files in /home with ownership set to aghori and group membership set to any group but aghori:
# find /home -user aghori -not -group aghori

To find files in the /etc/rc.d directory that were modified more than 120 days ago:
# find /etc/rc.d -mtime +120

To find files in the /etc/rc.d directory that have not been accessed in the last 90 days:
# find /etc/rc.d -atime -90

To find files in the /etc/rc.d directory that were modified exactly 10 days ago:
# find /etc/rc.d -mtime 10

To search for core files in the entire directory tree and delete them as found without prompting for confirmation:
# find / -name core -exec rm {} \;

*** Soft Link
A soft link (a.k.a. a symbolic link or a symlink) makes it possible to associate one file with another. It is similar to a shortcut in MS Windows where the actual file is resident somewhere in the directory structure but you may have multiple shortcuts or pointers with different names pointing to it.
$ ln -s file1 newfile_softlink
$ ll -i
36 -rw-rw-r–. 1 aghori aghori 0 Jul 28 07:30 file1
32 lrwxrwxrwx. 1 aghori aghori 7 Jul 28 14:23 newfile_softlink -> file1

If you remove the original file (file1 in this example), the link newfile_softlink will stay but points to something that does not exist.

–Hard Link
A hard link associates two or more files with a single inode number. This allows the files to have identical permissions, ownership, time stamp, and file contents. Changes made to any of the files are reflected on the other linked files. All files actually contain identical data.
$ln newfile2 newfile20

After creating the link, run ll with the -i option:

$ ll -i
32 -rw-rw-r–. 2 aghori aghori 0 Jul 28 14:29 newfile2
32 -rw-rw-r–. 2 aghori aghori 0 Jul 28 14:29 newfile20

–Changing Access Permissions
Add the execute permission for the owner and run the ll command to verify:
$ chmod u+x file1

Add the write permission for group members and public and run the ll command to verify:
$ chmod go+w file1

Add the execute permission for the file owner and run the ll command to verify:
$ chmod 544 file2

Add the write permission for the owner and run the ll command to verify:
$ chmod 744 file2

–File Ownership and Group Membership
To change ownership from user1 to user2:
# chown user2 file10
# ll file10
-rw-r—–. 1 user2 user1 0 Jul 29 07:00 file10

To change group membership from user1 to user2:
# chgrp user2 file10
# ll file10
-rw-r—–. 1 501 user2 0 Jul 29 07:00 file10

To modify both ownership and group membership in one go:
# chown user1:user1 file10
# ll file10
-rw-r—–. 1 user1 user1 0 Jul 29 07:00 file10

To modify recursively (-R option) all files and sub-directories under dir1 to be owned by user2 and group user2:
# chown -R user2:user2 dir1

–Executing a Command Immune to Hangup Signals
For example, to copy /sdata1 directory recursively containing 20GB of data to /sdata2, issue the cp command as follows:
# nohup cp -av /sdata1 /sdata2 &

–How to get octal file permissions on Linux/Unix command line

$ stat -c '%n %F %A %a %U:%G %C' /tmp
/tmp directory drwxrwxrwt 1777 root:root system_u:object_r:tmp_t:s0

reference: How to get octal file permissions on Linux/Unix command line

Tutorial:
Files to copy when migrating your Lotus Notes installation to a new computer (Windows Mac)

Troubleshooting

Problem

You have a new workstation to which you need to transfer your Lotus Notes configurations and data. What are the default files a user needs to copy over from the old workstation to the new workstation?

Resolving The Problem

The necessary system files are as follows:
1. Personal Address Book (typically Names.nsf; check the NAMES entry in the Notes.ini to confirm).
2. Bookmark.nsf
3. Desktop.ndk
4. Notes.ini
5. The user’s .ID file.


Windows:
Folder location
c:¥Notes\Data

Files:
bookmark.nsf
desktop8.ndk
names.nsf
The user’s.nsf
The user’s.ID

MAC
Folder location
/Users/{YourUserName}/Library/Application Support/IBM Notes Data

You may use the below code to change directory to the above folder
cd ‘/Users/{YourUserName}/Library/Application Support/IBM Notes Data’

Berbagi cerita tentang Furusato Nouzei ふるさと納税 (pajak kampung halaman) di Jepang

Beberapa pekan lalu ikut kajian tentang berbagi pengalaman terkait Pajak di Jepang dan berbagai bentuk kemudahan dan variasi penyalurannya. Salah satu yang cukup menarik perhatian saya adalah tentang Furusato Nouzei (ふるさと納税) atau pembayaran pajak ke Kampung Halaman.

Furusato nozei adalah pengalihan sebagain pembayaran pajak oleh orang-orang yang tinggal di perkotaan ke daerah-daerah dengan maksud untuk menggerakkan ekonomi di daerah yang memiliki hak otonomi di Jepang. Hal ini dikarenakan di daerah-daerah saat ini populasi orang tua-tua meningkat (bukan usia produktif pajak) sehingga pendapatan pajaknya menurun sedangkan di kota pendapatan pajaknya naik sehingga perlu diratakan dengan furusato nozei.

Kabarnya, Furusato nozei sudah berlaku cukup lama di Jepang, hanya saja mulai tahun 2016 ketika ada perubahan atauran dan administrasi, proses pengajuannya menjadi jauh lebih mudah. Banyak orang yang menggunakan furusato nozei. Salah satu yang menarik sehingga furusato nozei banyak diminati adalah adanya tanda terima kasih dari kota yang menerima pajak kita berupa barang-barang yang nilai pasarnya bisa cukup tinggi mencapai sekitar 30-40 persen bahkan ada yang sampai 50 persen dari donasi yang kita berikan.

Kemudahan aplikasi Furusato Nouzei semakin terbantu dengan fasilitas belanja online dari Rakuten.
Salah satunya bisa merujuk pada link berikut: https://event.rakuten.co.jp/furusato/

Ada banyak pilihan yang bisa disesuaikan dengan minat dan kebutuhan kita. Nah, karena saya sangat suka mengkonsumsi buah Nashi (pear Jepang), pilihan saya jatuh pada salah satu kota yang menyediakan paket Furusato Nouzei seharga 10,000 Yen dengan hadiah berupa buah pear sekitar 5-6kg (kurang lebih 9 butir buah pear Jepang ukuran besar). Saya pun memberanikan diri untuk membeli paket tersebut secara online.

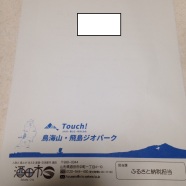
Sekitar 1 bulan kemudian, paket buah pear Jepang yang saya beli dari Rakuten Furusato Nouzei pun tiba di rumah. Ternyata di luar perkiraan, buah pear Jepang yang dikirimkan ukurannya besar-besar dan ranum. Terima kasih Furusato Nouzei!

Untuk referensi, silakan menyimak materi detail seputar Furusato Nouzei:

Slide Materi

Video

Catatan perjalanan Haji dari Jepang (Bagian 2)

Bismillahirrahmanirrahim

Dengan menyebut nama Allah yang Maha Pengasih lagi Maha Penyayang.

Assalamualaikum warrahmatullah akhifillah dan ukhtifillah yang diberkahi Allah, aamiin..

Berangkat Haji maupun Umrah dari Jepang merupakan rezeki yang dobel dobel menurut saya, alhamdulillah..

Kenapa?

Diberikan kemudahan untuk tidak mengalami ujian “waiting list” ketika berangkat haji, karena Jepang jumlah penduduk Muslimnya sangat sedikit, jadi tidak harus menunggu lama untuk berangkat haji maupun umrah ( yang waiting list uang dan kondisi ya?) hehe
Menambah Saudara Islam, jamaah dari beraneka macam rupa, dari bahasa, negara,(Indonesia, Malaysia, India, Pakistan, Bangladesh, Persia, Jepang asli ^^, dan Cina Muslim) otomatis jadi harus bisa bahasa jepang dan inggris, walaupun jamaah Indonesia juga banyak , tapi klo cuma ngobrol sesama Indoneia-ers gak gaul kita hehe..
Biaya yang dimudahkan, insya Allah, Allah pasti memberikan kemudahanNya bagi hambaNya yang berniat dan ikhtiar haji. Biaya haji dari Jepang kurang lebih sama dengan biaya ONH plus Indonesia, dengan kemudahan kemudahan yang didapat berupa pendapatan yang bisa ditabung lebih cepat dari hasil baito atau arubaito (tentunya hal ini relatif ya.. )
Suhu dan keadaan yang sudah terkondisikan, bagi yang sudah terbiasa tinggal di jepang pasti sudah gak kaget dengan jalan kaki jauh dan naik tangga ^0^ Ketika menjalankan ibadah haji, satu hari nya mungkin kita bisa berjalan kaki sejauh 10 km.. ^0^// Suhu ketika musim panas di Jepang bisa mencapai 38-40 C bisa dijadikan pelajaran berharga untuk belajar sabar ketika kita berada di tanah suci (ketika kami berhaji, suhu paling tinggi sekitar 42 C)

Catatan perjalanan Haji dari Jepang (PENDAHULUAN)

Bismillahirrahmanirrahim

Dengan menyebut nama Allah yang Maha Pengasih lagi Maha Penyayang.

Assalamualaikum warrahmatullah akhifillah dan ukhtifillah yang diberkahi Allah, aamiin..

Alhamdulillah, segala puji serta syukur selalu kita panjatkan selalu kepada Allah, Tuhan semesta alam yang memberikan kita banyak kenikmatan, dan salam shalawat kepada imam kita Rasulullah sallallahu alaihi wasallam beserta keluarga san sahabat Beliau.

Sungguh tak bisa dilupakan ketika kami diberikan kesempatan Allah untuk datang ke rumahNya pada hari itu. Bangunan berbentuk persegi, diselubungi kain hitam bertuliskan lafadz Syahadat, di salah satu sudutnya terdapat Hajar Aswad, dan pintunya bernama Mulatazam, bangunan itu tiada lain adalah Ka`bah . Bangunan yang selama ini kita sholat menghadapnya.

Hampir setahun yang lalu kami melakukan Thawaf mengelilingi Ka`bah tapi rasanya masih kemarin kami melakukannya, dan rasanya ingin sekali kami kembali lagi ke sana ( ngarep rezeki Allah ^O^)

Insya Allah akhifillah dan ukhtifillah diberikan kesempatan serupa untuk bisa pergi ke Tanah suci secepatnya ^o^// dan bagi yang sudah pergi semoga bisa ke sana lagi dalam ibadah umrah ( jangan lupa ajak ajak ^0^ )

Cuap cuap pendahuluan sampai sini aja deh hehehe,,

Sampai bertemu di postingan selanjutnya ^^

Afwan lahir batin, jazakillah khoiran katsiran

Wassalamualaikum Warrahmatullah


thumb_IMG_2786_1024


~~~~~~~~~~~~~~~~~~~~~~~~~~~~~~~~~~~~~~~~~~~~~~~~~~~~~~~~~~~~~~~~~~~~~~~~~


Linux command for LPIC preparation

LPIC 1 Objectives

LPIC-1 Exam 101 Objectives

UNIT 1
history -d 100
history -c = clears the history

Occasionally, the problem arises where you can’t remember the exact name of a command to look up
$ man -k “system information”
dumpe2fs (8) – dump ext2/ext3/ext4 filesystem information
uname (1) – print system information

Linux file descriptor:
Standard Input (STDIN) = 0  <, << Standard Output (STDOUT) = 1  >, >>
Standard Error (STDERR) = 2

echo $PATH 1> path.txt
echo $PATH > path.txt
A common trick is to redirect standard output or standard error to /dev/null. This file is a device that’s connected to nothing; it’s used when you want to get rid of data.
whine 2> /dev/null

date +%M

mkdir -p /home/yuko/a/b/c
mv -f /tmp/A/* /targetfolder

rm -Rf /tmp/A /*

cp -Rf /tmp/A/* /targetfolder
echo ‘$HOME’ = $HOME

echo “$HOME” = /home/yuko

echo `date +%M` = 50
lsattr filename

Continue reading